How to Handle Negative Online Reviews

Managing online reputation effectively is crucial for businesses. According to Invesp, 88% of customers say that their purchasing decisions are influenced by online reviews as much as personal recommendations.

While negative feedback cannot be eliminated, it can be managed and leveraged as a source of valuable insights. It is impossible to please everyone, which means someone inevitably is going to say something negative about your business on social media or online review platforms such as your Google Business Profile. 

According to a study in the Journal of Consumer Research, customers are more likely to share negative experiences twice as much as positive experiences. Therefore, it is important to find and utilise ways to manage negative online reviews and their potential impact on your business.

Here are 10 pointers on how to handle negative feedback:

  • Avoid engaging with trolls and defamatory reviews
  • Respond promptly and mindfully 
  • Don’t delete genuine comments
  • Take sensitive conversations offline
  • Acknowledge criticism 
  • Find solutions and potentially turn critics into fans
  • Use feedback as fuel for growth
  • Handle negative posts professionally 
  • Request the removal of fake and misleading reviews and delete comments that only serve the trolls
  • Have a heart

Keep reading to learn how to integrate these valuable tips. 

online negative reviews and feedback


Don’t feed the Trolls

  • Keep an eye out for people just looking to cause trouble.
  • Troll-baiting can get ugly quickly. Avoid confrontation.
  • If a review is clearly defamatory ask the site to have it removed.
  • You can also block the user on Facebook.

Engage Mindfully

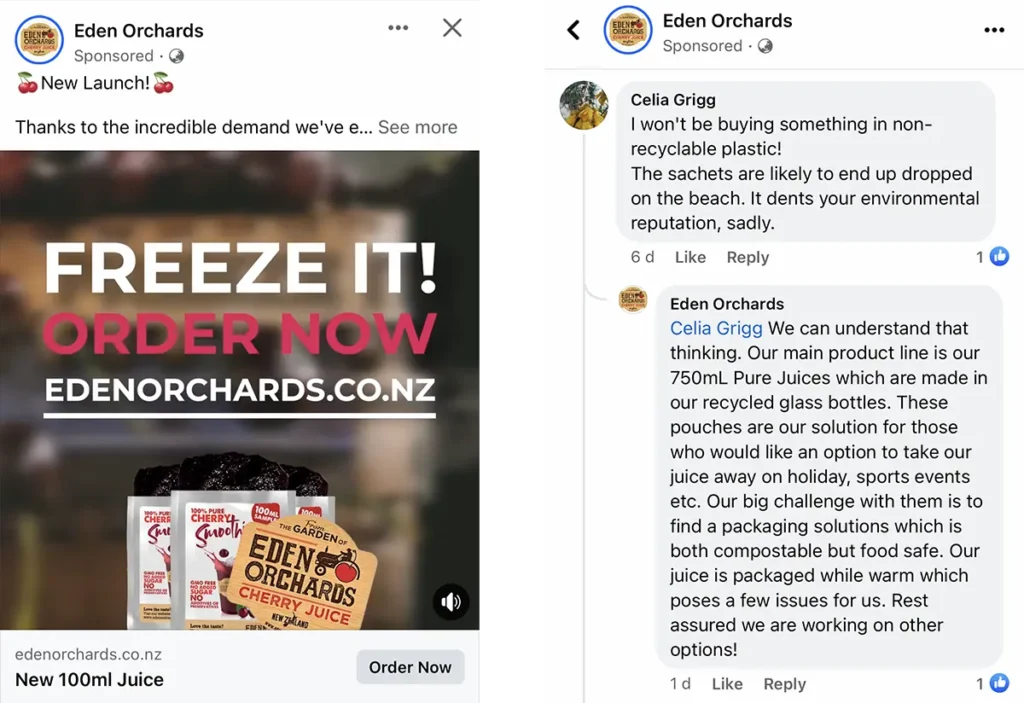
Be mindful of negative comments and respond to the complainer as quickly as possible. Ignoring a problem is only going to make things worse. Negative comments, when left unattended, tend to snowball quickly. When someone expresses a negative opinion about your brand, respond calmly and courteously. More importantly, avoid getting personal and never engage in an attack or retaliation.

See this example showing how Eden Orchards was able to use this feedback on their ad to explain their packaging choice.

Eden Orchard new product negative feedback handled appropriately. How to handle negative reviews example from eden orchards.


Don't delete the comment

Deleting valid comments will anger the customer and they might end up telling more people about this experience. 

Instead of deleting, respond by acknowledging the situation and that you would like to come to a resolution and offer a means of contact offline. Social media can be a great channel to surface a problem, but it's not always a great place to try and solve it.

There's nothing to be gained by picking a fight with a customer or community member online, and it can put the brand reputation at risk.

Find a Solution

When dealing with complaints, it is crucial to discern between customers  who are simply venting their frustrations, and those who are genuinely sharing their experiences to help you identify what needs to be improved in your business. 

Through these complaints, you may decide to act proactively and find solutions for your customers and discover how your business can develop moving forward.  

Remember not to take these complaints to heart, embrace the criticisms as these will help improve your business. In a survey conducted by Harris, it found that among customers who received responses for their negative reviews, 18% of those became loyal customers as a result. Now that’s a turnaround any business would be happy with.

Use Feedback as Fuel for Growth

Criticism or complaints online can be painful, but in reality, they're a gift.

Consider critical posts as opportunities to identify weak links in your operations, communications, or customer service processes. Even if you can’t solve the problem immediately, simply acknowledging the issue, apologising, and communicating what you're doing to investigate or address the problem can go a long way towards mending fences with an upset customer.

Often, the act of communicating and acknowledging the misstep can turn a critic into a fan, simply because many companies don't do it well or at all.

Dealing with Negative Posts and Trolls

Community dialogues, such as on social media, should be authentic and balanced. A degree of negative feedback is to be expected and at this point, you know how to avoid trolls, directly address concerns, and find solutions.

However, there are some matters that require further attention: for example, posts with offensive and sensitive material and those with profanity may be immediately taken down or deleted.  

Extreme trolling is also an entirely different matter. If they repeatedly breach your community guidelines, you can ban the user from your page. If they violate Facebook's terms, do not hesitate to report them.

Never get personal 

Be considerate and provide a unique response, but avoid getting personal and never engage in an attack or retaliation.

Request Fake or Misleading Reviews Be Removed

Reviews may not all be reliable - some users mistakenly review a company that has a similar name or possibly spam. When reported to the platform, these types of reviews may be removed because they typically violate terms of service agreements.

Have a Heart

Remember, behind these negative comments, complaints and criticisms are people who may have felt dissatisfied with their experience in your business. 

Keep in mind that their complaints are valid and what may seem straightforward to you may seem confusing to the customer. So be patient, address their concerns by also apologising, and find solutions.


Do I Need Google Search Console for My Website?

Google Search Console (GSC) is a free tool provided by Google that helps website owners monitor their website's performance in Google search results and will alert of any technical SEO issues. By connecting your website to Google Search Console, you can see how many people visit your site, which keywords they used to find your site, how Google crawls and indexes your website, and if there are any issues with your site that need resolving.

Below are some of the tasks you can accomplish using GSC:

  • Monitor how your site is performing on Google
  • Submit Sitemaps and Individual URLs for Crawling: A sitemap is a file that provides information about the pages on your site to search engines. By submitting your sitemap, you help Google better understand the structure of your site and index its content more effectively.
  • Check Indexing Status: See which pages of your website have been indexed by Google and which ones have not.
  • Identify and Fix Errors: Google Search Console alerts you to any crawl errors, server errors, or other issues that may be affecting your site's visibility and ranking on Google. By addressing these errors promptly, you can ensure that your website is more search engine-friendly and user-friendly.
  • And more
The importance of having Google Search Console on your business website


Why do businesses need to have Google search console connected to their website?

This is a valuable tool for understanding how their websites are performing in search results and identifying potential issues that could be affecting their website's visibility. By monitoring the data in Google Search Console, business owners can optimise their website's content and structure to improve their search rankings and drive more traffic to their website.

To find out how to connect your site and a comprehensive guide to the various tools within GSC, check out SEMrush’s GSC 2023 Guide 


10 Necessary Steps to Protect Your Facebook Page

Facebook is a valuable tool for businesses and individuals alike but it's crucial to ensure that your Facebook page is secure from potential hackers. Cybersecurity breaches can harm your reputation, damage your business, put sensitive information at risk and cost you time and money. Therefore, it's essential to take steps to protect your Facebook page from being hacked.

Here are our top ten necessary steps to secure your Facebook Page:

Step #1  Use strong passwords

Ensure your passwords are a random mix of at least 14 to 16 characters - letters, numbers and symbols, and avoid using common phrases or words.

So long as you are using a strong password – along with 2FA – you shouldn’t need to change your password that often. However, some security experts suggest changing your password every few months.

Step #2  Enable two-factor (2FA) or multi-factor authentication (MFA) – a MUST

Two-factor authentication is an additional layer of security that requires a code to be entered along with your password. This code is usually sent via text message or generated through an app. By enabling two-factor authentication, you can significantly reduce the risk of your Facebook account being hacked.

In fact, if you’re running Meta ads, your ads will quite possibly perform better so long as EVERY admin of your Page has 2FA set up. And you might see an ever so slightly better organic reach for your posts too.

You access 2FA under your Security and Login settings.

Although most use SMS to receive a code via text message for 2FA this is actually not the most secure way to set up 2FA as phone numbers can be spoofed.

So, for optimal security, it’s much more effective to use an Authenticator app. Google Authenticator (iOS or Android) and Duo Mobile are among the top authenticator apps.

Many online services not just Facebook - Amazon, Dropbox, Google, PayPal, Slack and Twitter all support authenticator-generated codes as an alternative to SMS-based codes. All the apps can be used for multiple accounts, and you don't need to have a cellular connection, or even Wi-Fi access, on your phone for the codes to work.


Step #3  Do not share your login credentials

Never ever share your login credentials with anyone, for any reason. To share access to your business page, use Business Manager or Business Suite and add Admins with appropriate roles and ensuring they also have 2FA set up.

Step #4  Monitor your account activity

Monitor for any suspicious or unauthorised access. Check for any unusual login locations, device types, and login times. Enable “get alerts about unrecognised logins’ via in-app notifications and email.

Step #5  Account access

Regularly review who has access to your account and remove anyone who has moved on or should no longer have access.

Step #6  Keep your operating system and software up-to-date

Make sure to keep your operating system and software up-to-date, including your web browser, antivirus, and other security software. Regularly updating these components will protect you from known security vulnerabilities and improve the overall security of your system.

Step #7  DO NOT click on suspicious links

Hackers often use links to gain access to your Facebook account. Avoid clicking on suspicious links sent via DM and/or email – from Meta, an unknown source or even your trust friends as they could have been hacked. And especially not if they contain a message urging you to click.

Phishing is rampant these days and the scammers are getting cleverer by the day; it’s all too easy to fall prey to something that looks too good to be true. If in doubt, do not click! And, if sent via email, check the full sender’s email – often the scammers don’t even bother to cover the actual email address – which could look totally suspicious or could look plausible but will have something odd about the address like an extra part to the domain like this “mail.nzpost.co.nz”

Step #8  Don’t share password details

These are common are where hackers try to trick you into revealing your login credentials or other sensitive information. Don’t respond to emails or messages requesting your password or other login details.

Step #9  Log out of your account after use

Always log out of your Facebook account after using it, especially if you’re using a shared or public computer.

Step #10  Large following? Consider hiding

You might want to hide your Friends and Followers on your personal profile if you have a large number of them. The setting is under the 3 dots on your Friends or Followers tab. This is particularly important for profiles that get impersonated as it looks very enticing to a scammer to be able to act as you and try to scam your entire network.

Let’s connect!

Make sure you’re following my Facebook,  Instagram and LinkedIn page to stay up to date with all things social media marketing.


Instagram’s Latest Updates for 2022

Instagram has kept us hopping this year! Our team has noticed several new features added to Instagram's reels, posting functionality, API, and more... Let's have a look at the latest updates and how they can work in your favour.

Pinned Posts or Reels

Instagram has launched a new feature to allow users to pin up to three posts or Reels to the top of their profile grid. For users of Facebook, this tool will be familiar as we have always been able to pin posts to the top of the Page.

The ability to pin a specific post to your profile is a welcome feature for users who want to highlight their favourite posts that may have been buried somewhere in their photo grid. The feature could also be useful for those who post frequently but want to highlight a specific post. Currently users have the option to pin Stories to their profile and now also their posts or Reels.

How to Pin a Post:

  1. Select a photo or reel on the navigation page
  2. Click on the three dots in the top right corner
  3. Select “Pin to your profile” and that’s it!
Cre8ive Marketing Dunedin Digital Marketing Agency Instagram Post
Cre8ive Marketing Dunedin Digital Marketing Agency Instagram Pin to Profile


Once you have pinned a post, it will appear on the top of your profile page with a push-pin icon. To unpin a post, enter your profile page, repeat the steps above and select “Unpin from your profile”.

Auto Captions on Reels

Want to watch a Reel without disturbing others? Auto captions function in Instagram can help you do that.

Rolling out earlier in 2022, this feature will let viewers watch a Story or Reel without having the need to turn on their volume. Anyone speaking in the video – their words will be automatically displayed in the caption. By default, it's turned on to make Reels more accessible and easier to consume.

To turn on the auto caption for the Reel you are watching, simply click on three dots on the top right corner of the Reel -> manage captions -> turn on the “Captions” button. To add Auto captions to the Reels you are creating, click the “sticker” button and select “CAPTIONS” in the list.

Cre8ive Marketing Dunedin Digital Marketing Agency Instagram Auto Caption


90 Second Reels are Here

Now you can create a longer video, up to 90 seconds. The time limit expansion should provide users the opportunity to better communicate with their audience and showcase their offerings.

"You will have more time to share more about yourself, film extra behind-the-scenes clips, dig deeper into the nuances of your content, or whatever else you want to do with that extra time," says the official Instagram blog post.

New Stickers for Reels

The Poll, Quiz, and Slider stickers, previously only available in Stories, will now be available on Reels as well.

Try to poll your audience on questions, test your viewers’ skills, and ask them to share their feelings by adding Instagram stickers to your Reels.

No matter the content of your Reels, these will increase a level of interaction for your audience.

Cre8ive Marketing Dunedin Digital Marketing Agency Instagram Reel Sticker


Templates for Reels

Instagram now allows you to select the existing Reels and use them as templates to create your own!

When you find a Reel that has a “Use template” button above the poster’s user name, you can click on that button and enter the template editing interface.

Simply on “Add media” button and add or replace media sources inside. You can add both photos and videos as materials for your new Reel. Once you have finished, you add stickers, audio, and special effects as normal.

With this function, it is now easier than ever for you to easily create Reels without having to spend all your time editing and creating them from scratch.

Cre8ive Marketing Dunedin Digital Marketing Agency Instagram Use Templates


Import Own Audio to Reels

The updated Instagram now allows you to add your own audio (voiceover, sounds, music, conversations, etc.) into your Reel-making!

You can save the desired audio file to your local mobile storage and add it as your own audio to your Reel. You will see the new button called “Import” next to the “Saved” button once you click on the “Music” icon when making your Reel.

Cre8ive Marketing Dunedin Digital Marketing Agency Instagram Import Audio


API Opened Up for Reels

With Instagram Meta announcing that it is launching the Reel APIs for external uses, the third-party platforms will be able to create and schedule Reels and manage related activities in their Instagram accounts.

With API access, third-party platforms like Hootsuite, Later and Sprout Social can keep track of their social posts much easier and they can track cross-platform posts and activities in one place. The current API enhancements include Content Publishing, Insights, Comment Moderation, Hashtag Search, Business, Discovery, Mentions, Promote API, and Instagram Basic Display API.

Reels Cross Posting

Want to create a Reel for different platforms? Instagram’s new cross-posting function makes it easier to do that. Now you can automatically cross-post Instagram posts, Stories, and videos (Reels) to Facebook.

To check your cross-posting settings, tap your profile picture, then the menu icon. Choose “Settings” -> “Account” -> “Sharing to other apps” and then you can see the accounts liked to your IG account.

A great way to re-purpose your content and extend your reach!

More NFT Testing

Another new feature coming on Instagram Meta! Instagram Meta is now testing non-fungible tokens (NFTs). The token collection is expected to include art, images, videos, music, and trading cards. The initial test involves a small select group of U.S.-based creators and collectors. For this test phase, they're expanding access to more countries, so it won't be long until NFTs are widely available on Instagram.

Provide/Get Quotes for Services on IG

One more new function on Instagram Meta – they are testing a “Get Quote” button with select businesses. This button will allow the users to create questions in their profile or add a “Get Quote” sticker to their Stories to ask their customers questions.

Once customers fill out the questionnaire, they can then quickly request a quote from the business about a product or service. This new feature facilitates e-commerce leads and business-customer conversations.

Instagram's New 'Notes' Test

Instagram is also testing a new message function called “Notes”.

On the top of your inbox page, the user can create notes and see the notes created by their followers whom they have also followed back. You can create and share a note by clicking on the “+” button, inputting the message (no more than 60 characters), and sharing it with whoever you want to send the messages to.

Replying to a note will trigger a chat thread with the note creator, which will be private and only accessible to two of you. The notes are going to remain on your page for 24 hours and will be deleted automatically after that.

As it is still in the testing stage, it may not appear on all the users’ devices now but it is already on its way!

Cre8ive Marketing Dunedin Digital Marketing Agency Instagram New Notes

Management Capability Development Fund

Cre8ive Marketing offers services that are registered with the Management Capability Development Fund where small businesses may quality for up to 50% of the cost of training.

These three training courses are registered with this Fund: In-depth Social Media Training, Learn how to create a digital marketing strategy and Improve Your Website’s Online Visibility

Small businesses may qualify for funding to help pay for services such as training workshops, courses and coaching that build the management capabilities of their owners and key managers. Management Capability Development funding is only available through the Regional Business Partner Network (RBP) Growth Advisors and can be used with service providers registered with the RBP Network.

Funding may be provided to a business where the Growth Advisors have identified a need for management training as part of an action plan to support the business owner to grow and innovate their business. Business owners are then able to select a service from a registered Service Provider.

For more information on the Management Capability Development Fund or to find your local Growth Advisor go to www.regionalbusinesspartners.co.nz


InShot: All-in-one Video Editor


We know there are a multitude of benefits that video can have for businesses. However, more often than not people feel out of their depth when creating video content. Inshot is a video editing app which can be a game-changer for businesses wanting to create engaging content for their audience but just don’t know where to start.

InShot is a feature-rich app that lets you drill down into all sorts of editing and enhancement options. Just about everything you’d want to edit on a video can be done within this one app, and there are all different payment options so you can invest as much or as little as you want.

Some of the video editing features that InShot includes are:

  • Video trimming
  • Video splitting
  • Merging video clips
  • Importing photos or images
  • Applying various filter effects
  • Adjusting speed of video
  • Adding music or sound effects
  • Adding voice-over effects
  • Adding animations, stickers or text to videos

Steps to using InShot Video Editing App:

1) Download the app

First off, you’re going to need to download the free app from either the Apple store or Google play. 

2) Import and edit videos and images

The InShot app serves as a 2-in-1 editing tool because you can also edit photos. When you open the app, you’ll be asked to choose between importing photos and videos, editing photos and videos, or making a collage.

Once you select a photo or video to edit you should first adjust the canvas. For example, we recommend 1:1 or the square aspect ratio for video posts on Facebook and Instagram and 9:16 for Reels/Stories. From here you can crop it, trim it, add a background or integrate other visual and sound effects. These basic video editing tools are pretty decent for a business but there are far more exciting tools on offer.

3) Add sound and music

After you’ve made basic edits to your photo or video, you can then add sound effects, voice-over effects or music. InShot gives you the option to import a song from your device, or choose from the app’s music collection.

After you’ve selected sounds and music, you can control the volume of each using sliders.

4) Add text

Next, you’ll be able to add text onto the video. There is a wide array of font styles and colours to choose from. The text can be moved around the screen to get the perfect placement. InShot allows you to select start and end times for when you want the text to appear and disappear in your video. 

5) Add  animations and stickers

Inshot allows you to add custom animations, stickers and GIFs to your video for that fun, personal touch. 

6) Save and share

Once you’ve finished editing your video, all you need to do is hit the ‘save’ button in the InShot app. This will begin the rendering process, which may take some time. Once rendering and conversion is complete, the video will be saved and can be easily accessed in your Inshot gallery. From here you can share it directly to your social media channels.

InShot Pricing

The free version of InShot has a wide variety of tools you can access. However, if you like the app and plan to use it a lot, you’ll probably want to upgrade at some point, or at least spend some money on the enhancement packs you’ll use over and over. You can either do one-off purchases of enhancement packs or be a subscriber.

InShot Pro is the app’s premium version and it doesn’t have any limits on the effects, filters, stickers and transitions you can use. Plus, you won’t see the InShot watermark on your creations and there aren’t any ads.


Why Offering Too Many Options is Detrimental to Sales: The Paradox of Choice

It is a common mistake for a business to think that the more products and services they offer, the more revenue they will make. An increasing body of studies indicate that this isn’t actually the case.

It all has to do with choice. Intuitively we consider choice to be largely beneficial as it indicates that we have autonomy over our decisions and it ultimately gives us a sense of control. However, the relationship between choice and well-being isn’t so straight-forward. The paradox of choice was first discovered in 2000 by two Sanford psychologists. Their study was conducted at a local food market. On the first day there was a display table with 24 different kinds of jams. The following day at the market, people were only given a selection of 6 jam flavours. The larger display attracted more interest than the smaller one however, when it came to purchasing, people who saw the large display were one-tenth as likely to buy as people who saw the small display.

This study, as well as others, has provided evidence for the idea that choice ‘paralyses’ consumers. Overloading a customer with choice will lead to them being far less likely to make any purchase at all. What is more, if they do end up making a decision, the choice overload will reduce their satisfaction with that decision. Even if it was the right choice!

It is important to ask yourself whether or not you are offering too many choices to your clients. Ultimately, there is a diminishing marginal utility in providing alternative choices. If you can understand that each new option will subtract from the feeling of well-being your client walks away with, then you may realise that you’re offering too much. Psychologists have shown us that more options to decide between requires increased time and effort and can lead to anxiety, regret, excessively high expectations, and self-blame if the choices don’t work out. By reducing the amount of choice you offer, these impacts become negligible.

Obviously choice does provide some benefits, the more shoe sizes a store offers, the wider their customers base will be. However the paradox of choice requires us to think about the balance of how many products or services businesses create. You can overwhelm your customers with too many options and this could lead to indecision and consequently nothing purchased. A business that can understand the fickle balance of choice will be amply rewarded.


Latest Instagram Updates You Need to Know

With over 1 billion users, Instagram has grown to be one of the most influential social media platforms in the world. It is known to generate the highest engagement rates out of any platform, because of this, it pays to keep on top of all the movements and evolutions that are occurring within the site.

Here are just a few of the latest updates that all digital marketers should be aware of.

Reels Expands to 60 Seconds

While Reels were originally limited to 15 seconds and then quickly expanded to 30 seconds, we've been limited to that for a while. But now, all users should have access to the option to create 60 second Reels.

instagram reels now 60 seconds


New Reels Effect Grid

In another move to imitate TikTok, Instagram Reels have a new ‘Effects’ area and the grid where you choose your effect looks very TikTok-esque. If you haven't noticed it yet, go to Reels and select ‘Effects’ to see the new layout.

Facebook Shops

Facebook (owner of Instagram) has recently made a huge step into eCommerce by introducing Facebook Shops that are accessible though both Facebook and Instagram. Put simply, businesses can now create customisable catalogues of their products that users can browse, save, share and purchase from.


instagram shop


Insights for the Last 60 Days

IG insights in-app previously only gave you the last 7 days in the overview section. But now there is 60 days of data in the overview section and they'll be expanding this to 90 days in the coming months. On top of this, stories archives seems to have also been extended from 14 days to up to 2 years old.

Instagram Video Ads up to an Hour Long

Instagram is now allowing video ads up to an hour length for Feed, Stories, and Explore placement. While an hour-long video ad won’t be that appealing, this does at least mean you can use video ads longer than 2 minutes (the previous limitation). This will also allow you to include your Facebook video ads (that are longer than 2 minutes) in Instagram placements for more exposure.

Added Alt Text Feature

Instagram has introduced a new option of adding alt text to images. Not only does adding alt texts to website images help to better SEO ranking, it also means people with visual impairments can enjoy the social media platform more.

Stickers to replace ‘swipe-up’ links on Instagram

Instagram has just removed (end of August 2021) the ‘swipe up’ link in Instagram Stories in favour of a ‘link sticker.’ This link sticker will behave much like the poll, question and location stickers in that creators will be able to resize it, select different styles and place it anywhere in their stories. Ultimately this will enable greater engagement between audiences and creators.


Instagram stickers

Turn on Your 2-Factor Authentication Now!

If I could only share one single tip with marketers and business owners around the world, it would be to enable 2 factor-authentication across your most important accounts, right now. I have heard so many stories of Facebook Page’s being lost because someone was able to hack into an Admin’s email.

Why is 2-Factor Authentication so important?

It’s far easier than you think for someone to steal your password. Common actions like using the same password on more than one site, downloading software from the internet, or even clicking on links in emails can put you at risk of having your password stolen. There are a variety of harmful things a hacker can do once they gain access to your account. First and foremost they will lock you out of your own account. By having the 2 factor authentication in place means hackers can’t get into your account, even if they have the password.

How It works

If you set up two-factor authentication, you'll be asked to enter a special login code or confirm your login attempt each time someone tries accessing Facebook or Google from a browser or mobile device isn’t recognised. This login code will be sent to your phone via text, voice call or through the sites mobile app. You can also enable either Facebook or Google to send you alerts when someone tries logging in from a browser or mobile device that the site doesn’t recognise.

There are slight differences in the way each website’s 2-factor authentication works. It's best to follow these links and the instructions they give when setting them up.

For Google Accounts

For Facebook Accounts

Don’t lose control of your Facebook page that you have worked so hard to build. Make everyone who is an Admin on your Facebook page use 2-Factor authentication. It takes less than a minute, do it today.